Beginners' perimenopause workout | Improve cardio, posture and stability
Each exercise is adaptable to any fitness level and can be performed in a gym or at home. As with any circuit training workout, you'll perform each exercise after the other before repeating.
Benefits of peri menopause exercises
If you're perimenopausal – this beginners' programme is perfect for improving your posture, cardio, and overall stability.
What you need
To get started, all you need is a chair and a pair of water bottles or dumbbells. Make sure to leave plenty of space for arm raises and overhead weight exercises.
Warm-up and stretches
Before diving in, take a few minutes to warm up with a few easy stretches to target your muscles and joints. A 10-minute mobility warm-up with cardio-based movements can improve your range of motion and get your heart pumping.
The workout
The workout includes 9 exercises that you can modify by adding weights or increasing the pace for an extra challenge. We've included a mobility warm-up and a few cool-down stretches to help prevent injuries.
1. Squats
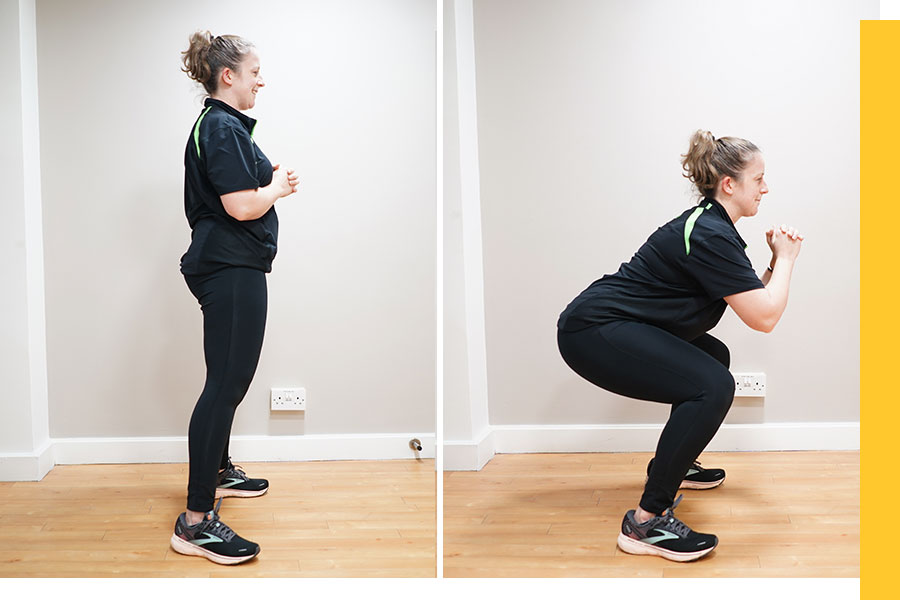
How to perform:
Stand straight with both feet hip-width apart.
2Tighten/brace your stomach muscles.
3Lower down, as if you're sitting in a chair.
4Straighten your legs to lift back up, not locking out the knees.
Safety Tip: avoid leaning forward and keep the back as straight as possible throughout the movement.
2. Standing
Side Crunches
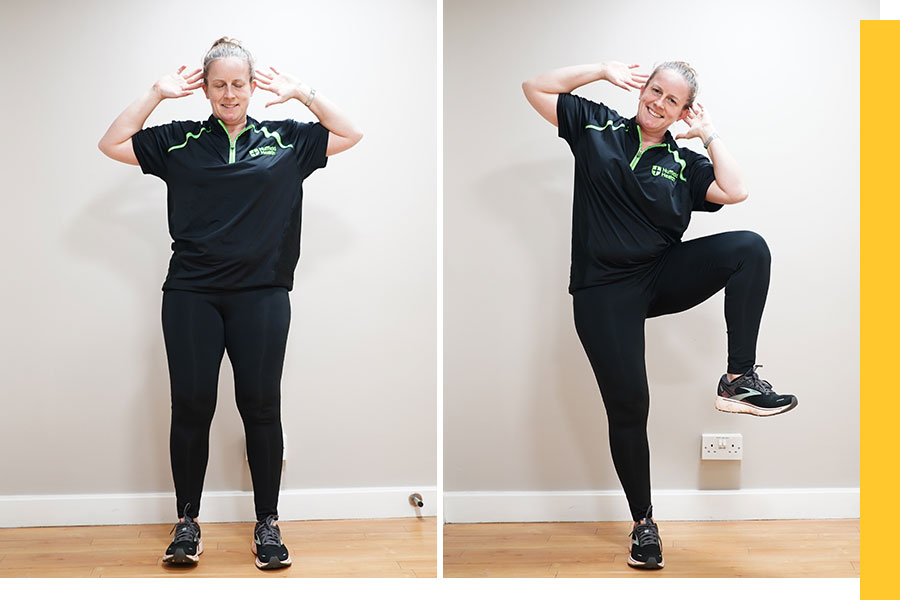
How to perform:
1Stand with your knees slightly bent, both feet hip-width apart, and your hands behind your head.
2Use your quads to extend one leg up until it is almost straight.
3Hold this position for a second and squeeze your quad before slowly lowering your leg back to the starting position.
Safety Tip: keep your feet on the ground and try to not overextend – your range will improve with more practice.
3. Standing Abductions
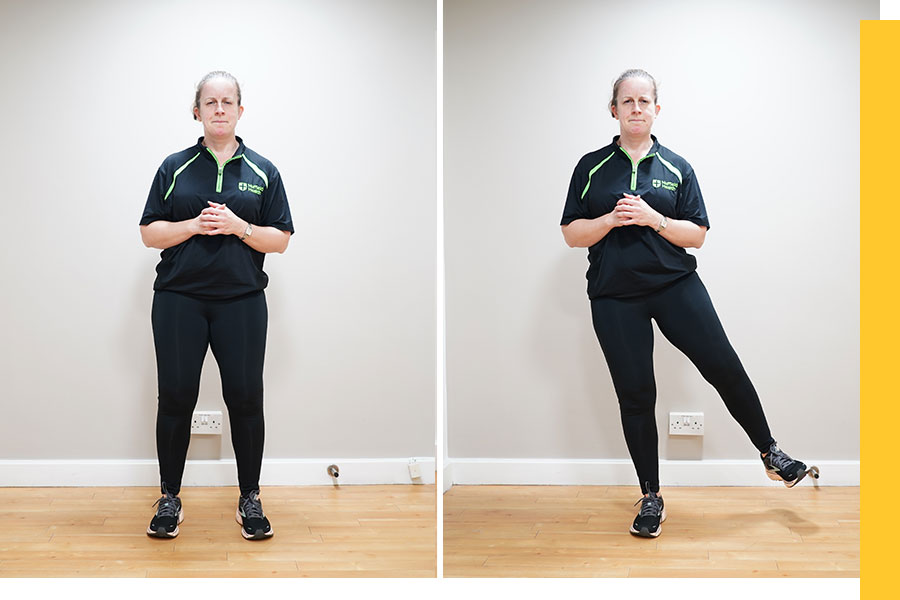
How to perform:
1Stand straight with both legs approximately shoulder-width apart.
2Keep one leg planted firmly on the ground. Whilst keeping the leg straight, move the other leg slowly upward to the side.
3Lower your leg and return to the starting position.
Safety Tip: make sure to keep the toes pointed during this exercise.
4. Slow
Mountain Climbers on Chair
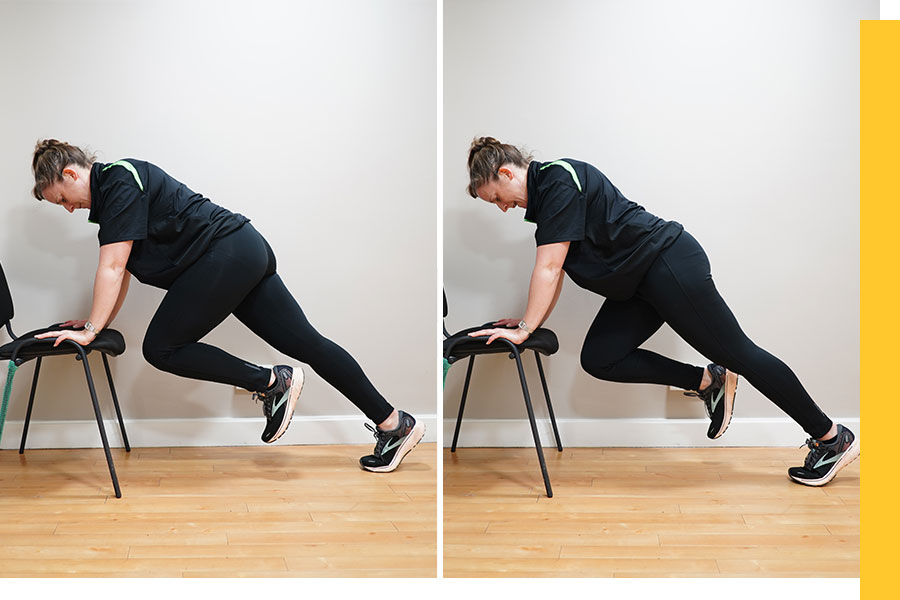
How to perform:
1Your hands should be shoulder-width apart, back flat, abs engaged and head in alignment.
2Pull your right knee into your chest as far as you can. Switch legs, pulling one knee out and bringing the other knee in.
3Keep your hips down and run your knees in and out as far as you can.
Safety Tip: avoid slamming your foot down, start at a slow pace and gradually build up the speed.
5. Overhead
Shoulder Press
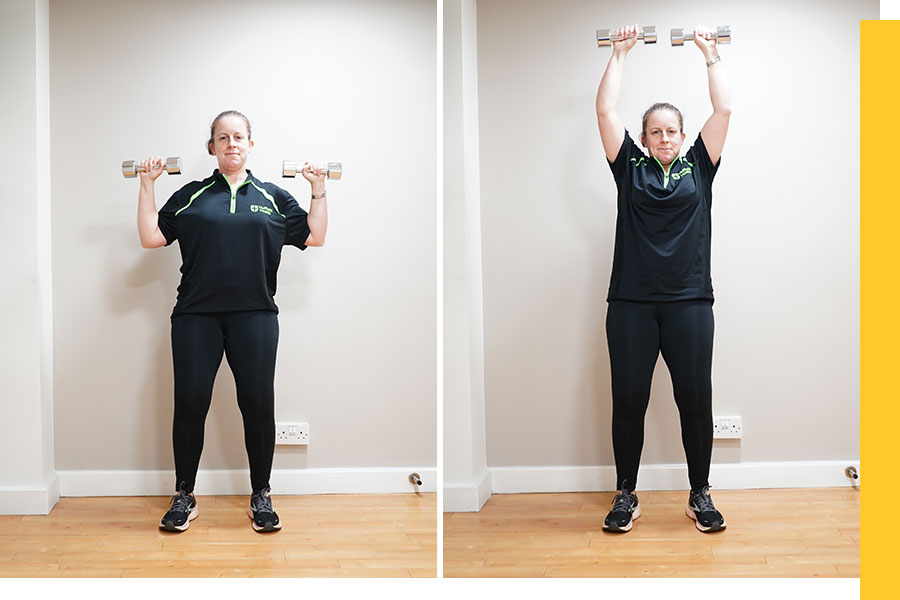
How to perform:
1Stand straight with both feet hip-width apart.
2Exhale as you raise the weights (or water bottles) above your head in a controlled motion.
3Pause briefly at the top of the motion.
4Inhale and return the weights to your shoulders.
Safety Tip: avoid leaning forward and keep the back as straight as possible throughout the movement. Do not hyperextend your lower back.
6. Lateral Raise
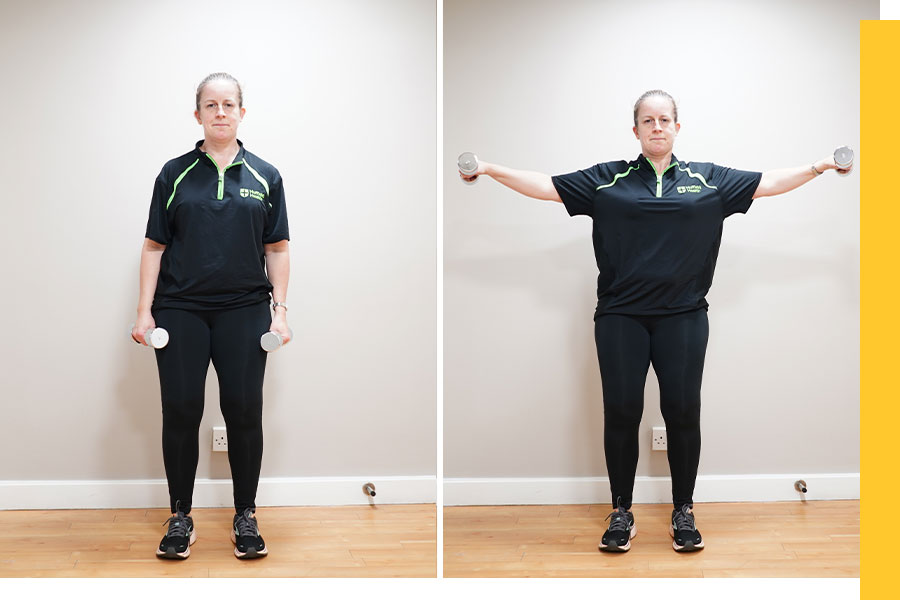
How to perform:
1Keep your shoulder blades pinned back.
2Slightly bend your elbows.
3Laterally raise the weights (or water bottles) slightly in front of your shoulders.
4Pause for a second when the weights (or water bottles) get to just below shoulder height.
5Take it slow and controlled on the way back down.
Safety Tip: avoid arching the lower back and extending your head to the ceiling when raising the arms.
7. Frontal
Raise
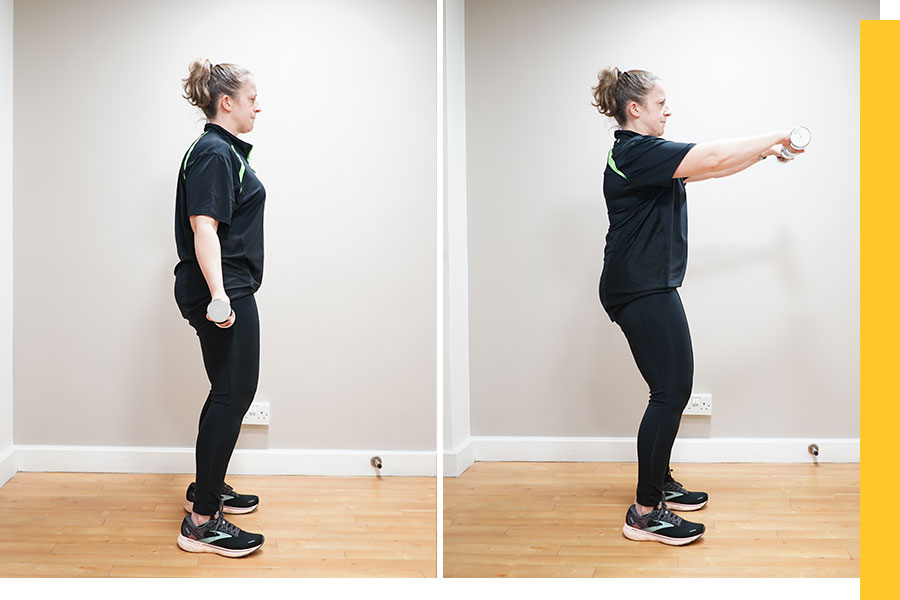
How to perform:
Stand with both feet shoulder-width apart. Hold the weights (or water bottles) in front of your thighs with your palms facing inward.
2Keep your back straight with both feet planted flat on the floor and ensure your abdominal muscles are tight and engaged.
3Raise the weights (or water bottles) straight up in front of you and stop just below shoulder height.
4Pause for a second, then slowly bring the arms back down to the starting position.
Safety Tip: avoid arching your lower back and move slowly throughout the movement.
8. Bicep Curls
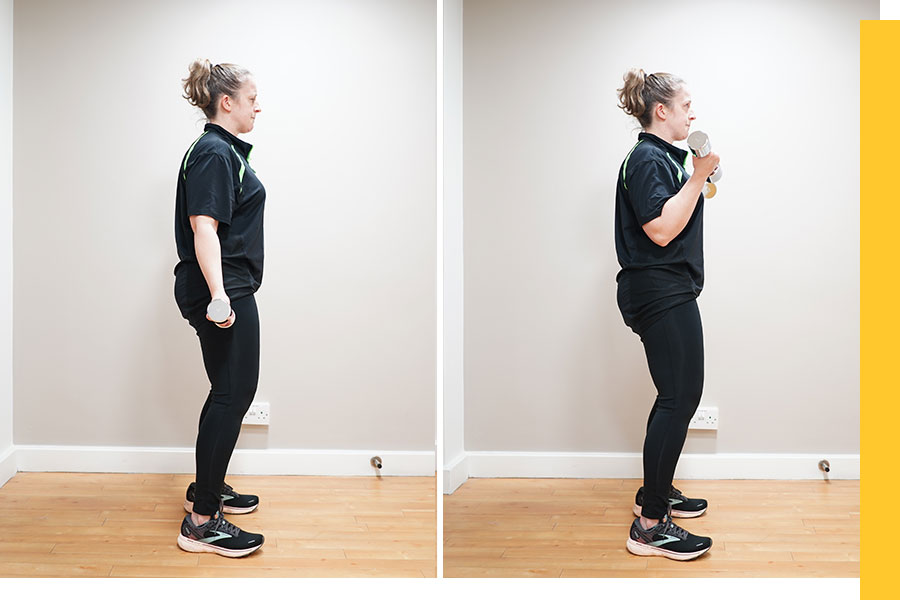
How to perform:
Start by holding a weight (or water bottle) in each hand with your arms hanging by your sides.
2Ensure your elbows are close to your torso and your palms facing forward.
3Keeping your upper arms stationary, exhale as you curl the weights (or water bottles) up to shoulder level while contracting your biceps.
Safety Tip: avoid leaning forward and keep the back as straight as possible throughout the movement.
9. Overhead
Tricep Extensions
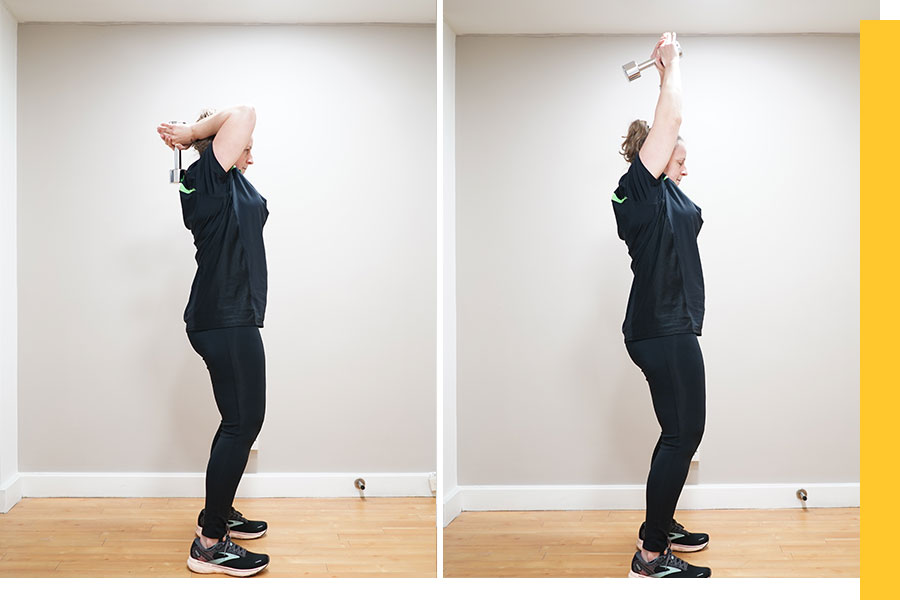
How to perform:
Slowly bend your elbows and lower the weight behind your head as far as you can.
2The weight should follow the path of your spine.
3At the lowest point, extend your elbows and extend the weight back overhead.
Safety Tip: avoid overreaching your form and range will improve with practice. Do not pull your head forward.
Cool down
Glossary:
RPE*: RPE stands for "Rating of Perceived Exertion." It is a subjective measure of how hard an individual feels like they are working during physical activity or exercise. Essentially, RPE is a way for individuals to rate their own level of exertion based on how difficult the activity feels to them, rather than relying solely on objective measures like heart rate or speed. RPE is often measured on a scale of 1-10, with 1 being very light activity (like walking) and 10 being maximum effort (like sprinting as fast as possible).
Last updated Monday 3 April 2023
First published on Wednesday 22 March 2023

